Hannah here, from the printmaking workshop. I’ve been given access to our blog for some technical writing, so get ready for a long, geeky ramble about all those beautiful little technical details which make printmakers start to talk with wide eyes, in fast, excited voices. For the first technical blog post, it seemed best to begin with photopolymer plate making.
Printing never begins with printing, and every process in the workshop requires some preparation (just wait until I start telling you about aligning the rollers, oh boy!) At Labora, we have our own, homebuilt, UV exposure unit, and our washout sink contains some ingenious French architecture (Thank you, Nicolas!), so we are able to develop photopolymer plates in house, by hand.
Photopolymer comes in a variety of different types, and the one we use is Toray “Torelief” WF95CH II, at total thickness of 0,95 mm and a 0,55 mm relief. Whilst we have also experimented with other thicknesses of polymer, this one is capable of giving a decent impression on our handmade paper, as well as on various weights of machine produced paper.
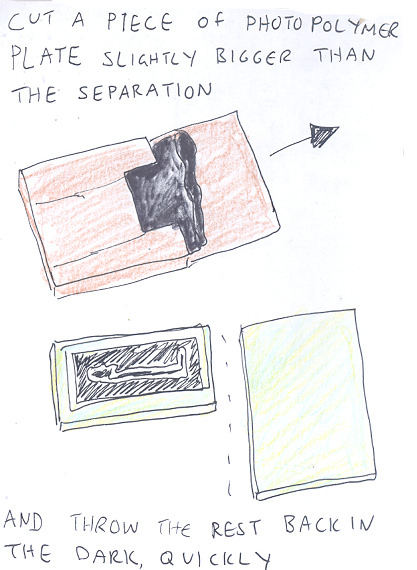
As the photopolymer packs come in A3 format, the first step is to cut a piece down to the necessary size. The separations we usually use are printed in negative on acetate sheets, which we place on top of the polymer, draw around with a marker, and cut down to size, leaving a comfortable border of around 5mm. As the photopolymer is sensitive to light, it is important to do this quite fast, and preferably in reduced lighting conditions, though it is not necessary to use a darkroom. The rest of the polymer is returned quickly to the box and to a dark cupboard.
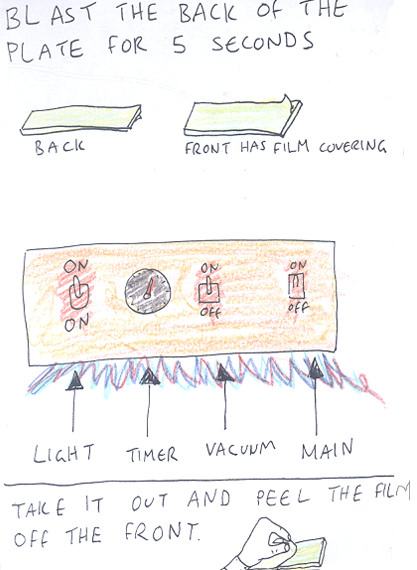
The next step is to expose the back side of the plate for 5 seconds. The back side can be recognised as the side with no transparent film covering, as shown in the drawing below. We have heard of other workshops which do not do this 5 second backside exposure, but the logic behind doing so is to ensure that the resulting polymer plate has a strong base, upon which the raised design is held. In terms of longevity, it seems that plates with a hardened backside are able to withstand a greater number of print runs, because those without tend to curl in on themselves, after repeatedly being stuck down and peeled away from the press base.
Once the backside has been slightly hardened, the design can be exposed onto the front side of the photopolymer. First the film is removed, then the photopolymer is placed into our homebuilt exposure unit. Some exposing tables expose from above, others from below. Ours has UV strip lights fixed into the lid of the box, so the exposure comes from above. The base of our unit has a grid cut into it, underneath which a pipe leads to a vacuum, recovered from a refrigerator. The polymer is placed on top of this, front side up, followed by the acetate separation (which is, of course, placed down with the back facing upwards. With relief printing, the image on the plate is a reverse image of the one which ends up on the paper, but anyone who has slogged this far through a technical blog post probably knows that already, right?). On top of the polymer and separation goes a transparent sheet of thin plastic. With these three layers in place and the vacuum switched on, air is sucked down, through the slots of the grid, pulling the transparent plastic sheet down and thus holding the separation tightly in place, on top of the polymer. Excess air can be pushed, by hand, from the centre outwards, ensuring no creases in the transparent film remain.

The UV lights are then switched on for 2 minutes and 8 seconds. Our clever little unit switches itself automatically off again, after this time has passed. If ever working with a hand drawn separation (for example, a black marker pen drawing on an acetate sheet) then the time can be reduced by approximately 10 seconds, to avoid light eating through the marker pen.
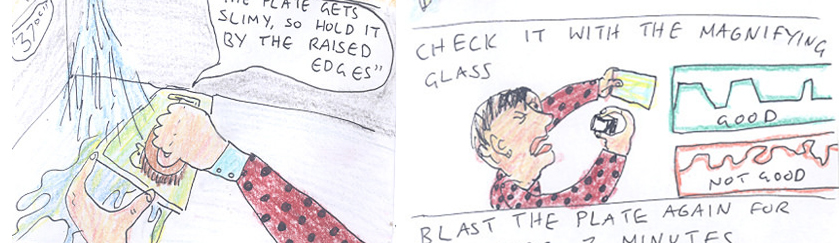
After exposure, the plate is in a very sensitive condition; it is important not to leave it out in the light, and not to touch the surface. A ghost image of the exposed design is visible on the surface, but the relief is not created until the plate is washed out. Mimicking photopolymer developing machines, we place a sheet of rubber onto a hard, flat surface, on top of which the photopolymer is fixed. The rubber, providing it begins dry, holds the plastic polymer in place through traction, and stops it from sliding around during the washout process. For added security, the 5mm borders of the plate can be held by hand during washout. We use a Box Car washout brush, the bristles of which are incredibly soft. It is possible to use other brushes, the softer the better. The water should be running at body temperature (37°C), and it is important to ensure that it remains so, throughout the duration of the washout. The other important factor of exactitude is the time spent washing out. Whilst the plate can usually handle up to 3 minutes of washing out, before the design begins to peel away from the surface, it is better to be faster, if possibly, particularly if the design contains small dots or lettering, or any thin lines. Keeping the brush moving constantly and evenly over the surface of the plate, watch as the non-exposed polymer disintegrates into a milky liquid, leaving behind the raised design, in relief. As the washout nears its end, the matt plastic is revealed below the milky substance, and it becomes clear that the base of the plate has been reached. Paying particular attention to the corners, in which the milky substance tends to gather, brush until the matt plastic is visible over the entirety of the plate then very quickly dry off the plate with a towel, and run to a source of heat.

We place our plates to dry in front of an electric heater, until both front and back are fully dry. The immediacy of this step is very important because, whilst wet, the photopolymer continues to develop. Once dry, the plate can be inspected with a magnifying glass. A successfully developed plate will have clean, sharp edges, with no goop collecting, for example, in the central holes of letters, or along the edges of surfaces in relief. If this goop is visible, assuming that the exposure time was correct, then the plate has not been washed out for long enough (though a little amount should not affect the print). If, on the other hand, pieces of the design are starting to peel away from the surface, then the plate has been washed for too long. This can tend to happen when the design contains a long, thin line in isolation, isolated dots, or particularly small lettering.

Once satisfied with the quality of the processed plate, it should be taken back to the exposure unit for its ‘second light’. The front side of the plate is again blasted with light for (2 minutes and 8 seconds), so as to further strengthen the plate. After this second light, the plate is fully processed and ready to be printed! Oh, but we still need to add sticky mount to the plate… lockup the base… register… ink the press.. adjust the pressure… okay, more geeky technicalities coming soon!
Drawings by Hannah